A helpful Raspberry Pi monitor reports real-time CPU performance, temperature, RAM usage, and other useful information.
BeginnerProtip1 hour6,133
Things used in this project
| Hardware components | |||||
 | Breadboard Mates TIMI-130 | × | 1 | ||
 | Breadboard Mates Pi Adaptor | × | 1 | ||
 | Breadboard Mates Mates Programmer | × | 1 | ||
| Software apps and online services | |||||
 | Breadboard Mates Mates Studio | ||||
Story
Adding a status monitor to any Raspberry Pi project can be very useful to give at a real-time glance status of how the CPU is performing in terms of usage, temperature and RAM use, and vital connectivity information. If overclocking is your thing, then this can prove extremely valuable to see what impact your settings have on the Pi and make adjustments accordingly.
The Breadboard Mates TIMI-130 display, together with the Breadboard Mates Pi Adapter, is a perfect choice for this project due to its ease of use and simplicity in code needed to get this up and running.
Breadboard Mates TIMI-130
Breadboard Mates provides a Python library that makes the Python coding experience effortless.
Step 1: What’s needed.
The project requires the following.
Hardware
- Raspberry Pi Model 3b or Raspberry Pi Model 4
- Breadboard Mates TIMI-130
- Breadboard Mates Pi Adapter
- Micro SD Card (for Raspberry Pi OS)
Software
- Raspberry Pi OS
- Python3 (built into Raspberry Pi OS)
- Breadboard Mates Studio
Step 2: Raspberry Pi setup.
Setting up the Raspberry Pi is very easy to achieve by visiting https://www.raspberrypi.com/software/ and following the instructions for installing the OS.
An Internet connection is required to install Python libraries and to Git Clone the Project files.
The Pi OS will need to be configured to enable SSH and enable the Serial port (UART) that we will use to talk to the TIMI-130.
Step 3: TIMI-130 Setup.
The Pi Adapter will need to be attached to the Pi GPIO Header and the TIMI-130 attached to the adapter, as shown below.
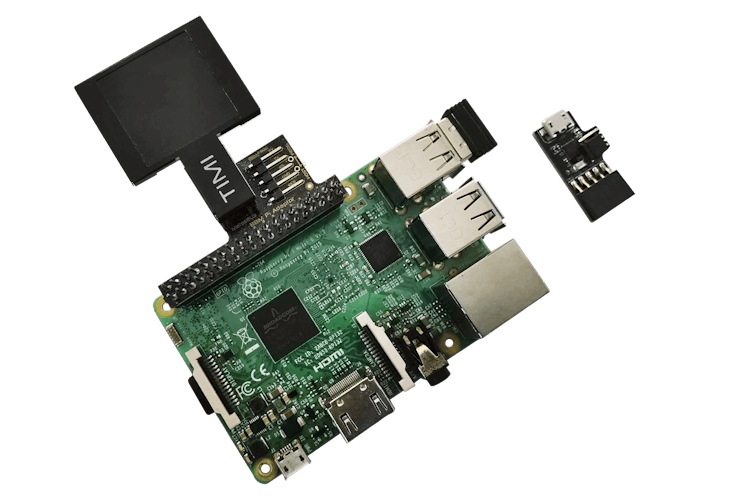
As the TIMI-130 needs to be configured for the Status Monitor, the switch on the Pi adapter needs to be set to PROG.
Next, attach the Mates Programmer to the Pi Adapter.
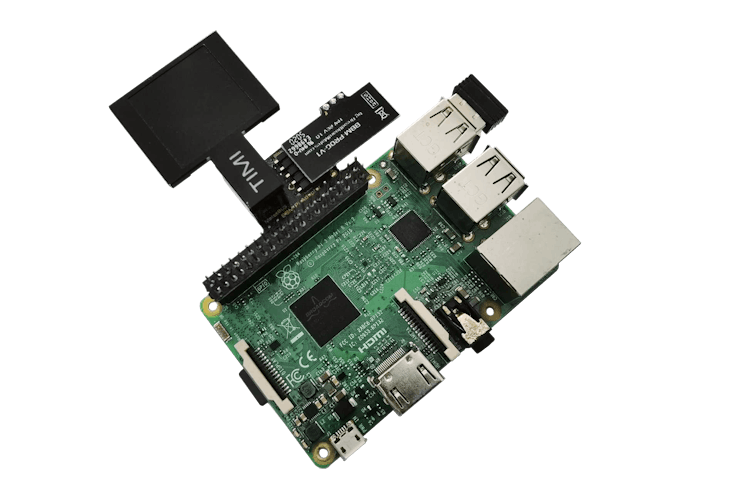
Connect a USB cable to the Mates Programmer and to a PC USB port. The TIMI-130 is now ready for the Status Monitor project to be installed.
Mates Studio will be required to configure the TIMI-130, and you can download it from here https://breadboardmates.com/products/mates-studio/
Creating The Status Monitor ProjectWhen you start Mates Studio, you will be prompted to select your product.
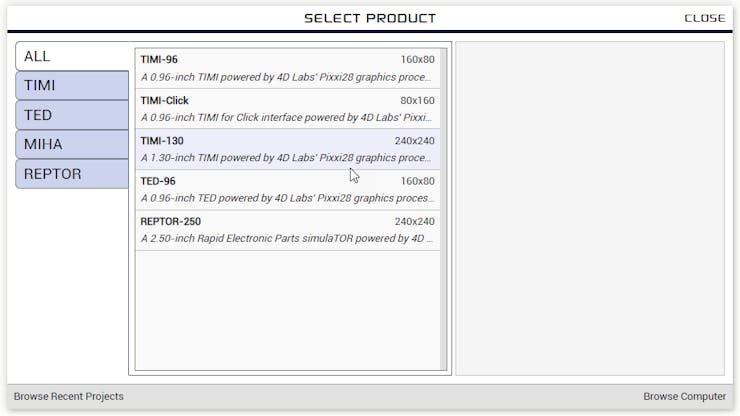
Click on TIMI-130, and a graphical representation of the TIMI-130 will appear on the right-hand panel.
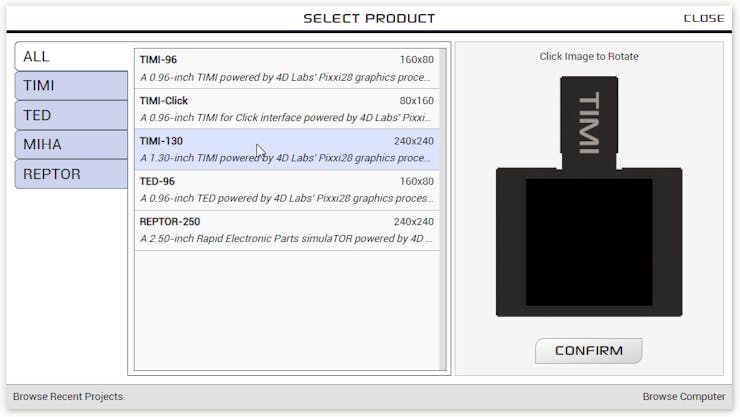
Click twice on the image of the TIMI-130 to rotate the display by 180 degrees.
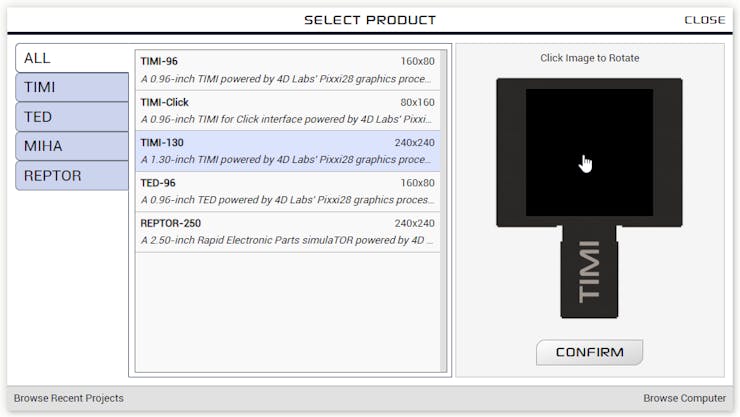
Click on CONFIRM and then select the Commander Environment.
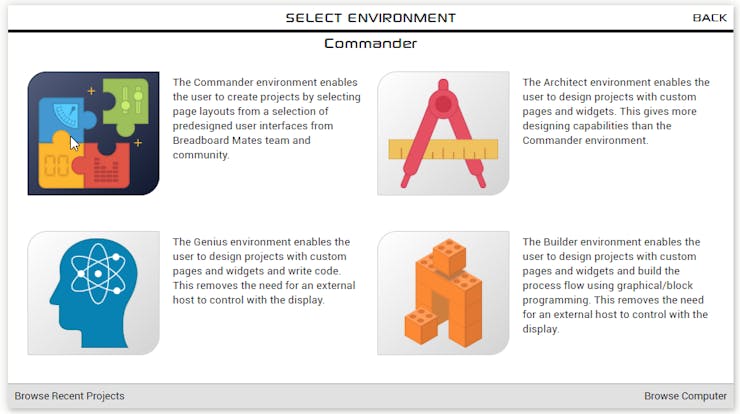
The Commander environment will now open.
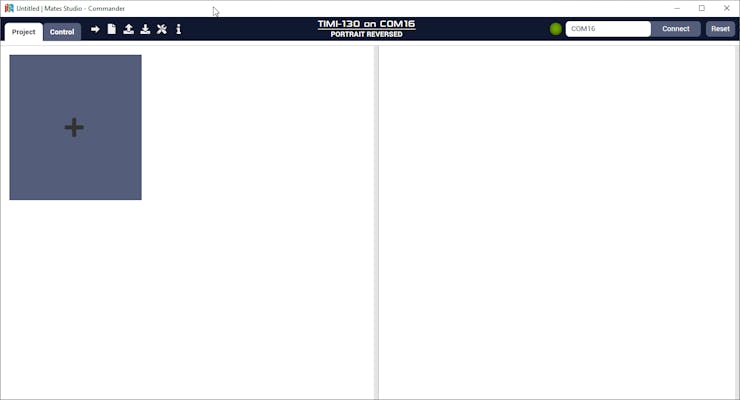
Click on the ‘+’ to browse the page library.
Then select Status and Resource Monitor from the Notifications tab, and click on CONFIRM.
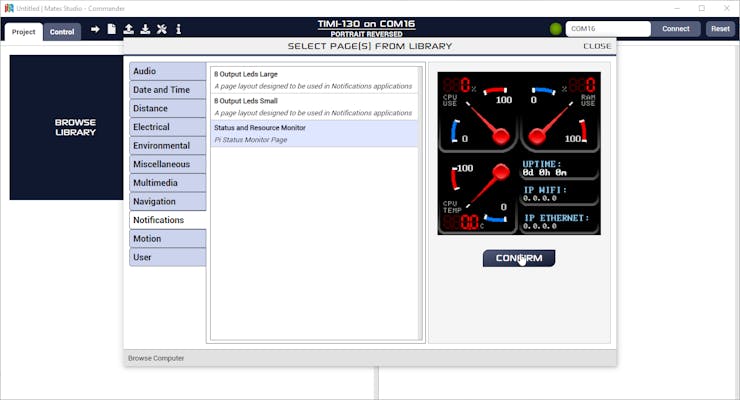
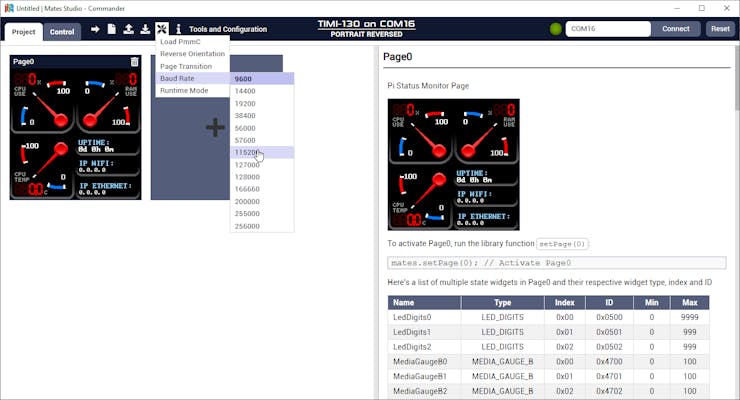
The Baud rate needs to be changed from 9600 to 115200 by clicking on the Tools and Configuration button and selecting 115200
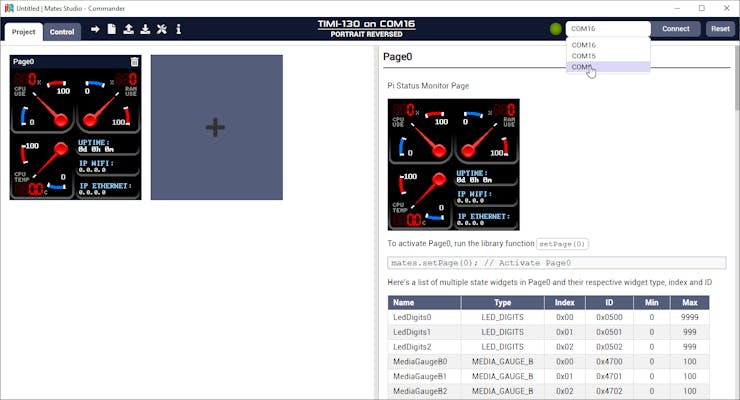
Next, select the com port for the Mates Programmer by clicking in the COM panel and selecting the correct port from the drop-down menu.
Finally, click on the Upload button to upload the Status Monitor to the TIMI-30.

The Status Monitor will now display on the TIMI-130
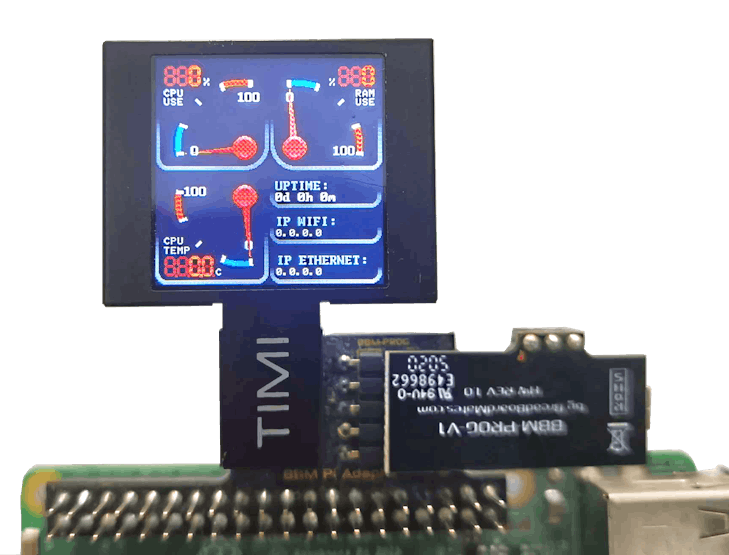
The USB lead and Mates Programmer can now be removed from the Pi Adapter. The Pi Adapter switch can now be set to HOST, ready to receive commands from the Pi.
Step 4: Installing the Python app.
All recent Raspberry Pi OS Distro’s are pre-loaded with Python 3 so we can install the required Python libraries using PIP.
The psutil library can be installed by running
pip3 install psutilNext, the Breadboard Mates Controller library can be installed by running
pip3 install rpi-mates-controllerNext, we can clone the Python code from Github
git clone https://github.com/BreadBoardMates/RPi-Status-Monitor.gitAlternatively, the Python code can be downloaded from here https://github.com/BreadBoardMates/RPi-Status-Monitor
Step 5: Running the app.
Move to the RPi-Status-Monitor folder
cd RPi-Status-MonitorThen run the application
python3 ./BBMPiStatusMonitor.pyThe TIMI-130 should first reset to an off-screen and then start showing the status of CPU use, CPU temp and RAM use along with connected IP address and uptime.
If you would like the Status Monitor to run as a background task, simply add ‘&’ to the command.
python3 ./BBMPiStatusMonitor.py &Enjoy your shiny Raspberry Pi monitor.
This project can be simply altered or improved to get the desired look by creating a new page in Mates Studio and changing the Python code to match with any new widgets used. The only limit is imagination.
Also Read:-
- What is Jupiter app? How to open free zero balance account? Refferal Code [HgCJgd] get ₹500
- Download Omegle APP Latest version v4.3.1 | Omegle APK
- Rupiyo App Download | Upi Withdrawal Earning from tasks 2023 | Refferal Code OTVKMW
- Trago Opinion trading App 2023, Get signup bonus.
- HDFC Lifetime Free Credit Card | How to get free Credit Card in 2023
- e-Shram Card: Registration, Apply Online, Benefits, Payment Status, Balance Check, Download(2023)
- Raspberry Pi
The Python code.
import time
import sys
import psutil
import socket
import fcntl
import struct
import uptime
from gpiozero import CPUTemperature
from rpi_mates.controller import RPiMatesController as MatesController
from mates.constants import *

def up():
    t = uptime.uptime()
    days = 0
    hours = 0
    min = 0
    out = ''
    while t > 86400:
        t -= 86400
        days += 1
    while t > 3600:
        t -= 3600
        hours += 1
    while t > 60:
        t -= 60
        min += 1
    out += str(days) + 'd '
    out += str(hours) + 'h '
    out += str(min) + 'm'
    return out


def get_interface_ipaddress(network):
    s = socket.socket(socket.AF_INET, socket.SOCK_DGRAM)
    try:
        return socket.inet_ntoa(fcntl.ioctl(s.fileno(), 0x8915,
                                struct.pack('256s',
                                network[:15].encode('utf-8')))[20:24])  # SIOCGIFADDR
    except OSError:
        return '0.0.0.0'


if __name__ == '__main__':

    mates = MatesController('/dev/ttyS0')

    mates.begin(115200)

    gtime = up()
    lastCpuUse = 0
    lastTemp = 0
    lastlTemp = 0
    lastRamUse = 0
    lastWIPaddr = '0.0.0.0'
    lastEIPaddr = '0.0.0.0'

    mates.updateTextArea(5, gtime, True)
    cpu = CPUTemperature()
    lastlTemp = int(cpu.temperature * 10)

    IPinterval = 0

    while True:
        cpu = CPUTemperature()
        gcpu = int(cpu.temperature)
        lcpu = int(cpu.temperature * 10)
        cpuuse = int(psutil.cpu_percent())
        ramuse = int(psutil.virtual_memory().percent)

        if cpuuse < lastCpuUse:
            lastCpuUse = lastCpuUse - (1 + (lastCpuUse - cpuuse > 9))
        if cpuuse > lastCpuUse:
            lastCpuUse = lastCpuUse + 1 + (cpuuse - lastCpuUse > 9)
        if gcpu < lastTemp:
            lastTemp = lastTemp - (1 + (lastTemp - gcpu > 9))
        if gcpu > lastTemp:
            lastTemp = lastTemp + 1 + (gcpu - lastTemp > 9)
        if lcpu < lastlTemp:
            lastlTemp = lastlTemp - 1
        if lcpu > lastlTemp:
            lastlTemp = lastlTemp + 1
        if ramuse < lastRamUse:
            lastRamUse = lastRamUse - (1 + (lastRamUse - ramuse > 9))
        if ramuse > lastRamUse:
            lastRamUse = lastRamUse + 1 + (ramuse - lastRamUse > 9)

        if gcpu != lastTemp:
            mates.setWidgetValueByIndex(MatesWidget.MATES_MEDIA_GAUGE_B,0, lastTemp)
        if lcpu != lastlTemp:
            mates.setLedDigitsShortValue(0, lastlTemp)
        if cpuuse != lastCpuUse:
            mates.setWidgetValueByIndex(MatesWidget.MATES_MEDIA_GAUGE_B,1, lastCpuUse)
            mates.setLedDigitsShortValue(1, lastCpuUse)
        if ramuse != lastRamUse:
            mates.setWidgetValueByIndex(MatesWidget.MATES_MEDIA_GAUGE_B,2, lastRamUse)
            mates.setLedDigitsShortValue(2, lastRamUse)

        if IPinterval > 20:
            tempIPaddr = get_interface_ipaddress('eth0')
            if tempIPaddr != lastEIPaddr:
                mates.updateTextArea(1, tempIPaddr, True)
                lastEIPaddr = tempIPaddr

            tempIPaddr = get_interface_ipaddress('wlan0')
            if tempIPaddr != lastWIPaddr:
                mates.updateTextArea(3, tempIPaddr, True)
                lastWIPaddr = tempIPaddr
            IPinterval = 0

        IPinterval = IPinterval + 1
        time.sleep(0.060)

        tempTime = up()
        if tempTime != gtime:
            mates.updateTextArea(5, tempTime, True)
            gtime = tempTime
        time.sleep(0.040)
The Python code will create a Mates Controller instance and start it at 115200 baud.
mates = MatesController('/dev/ttyS0')
mates.begin(115200)
A set of variables are then created which will be set after each time the various states are updated. This enables the main loop to compare the status that has just read with its last state and then update the corresponding widget only if it has changed in value.
lastCpuUse = 0
lastTemp = 0
lastlTemp = 0
lastRamUse = 0
lastWIPaddr = '0.0.0.0'
lastEIPaddr = '0.0.0.0'
Every iteration of the loop will update the widgets on the display if needed using the following simple commands
mates.setWidgetValueByIndex(MatesWidget.MATES_MEDIA_GAUGE_B,0, lastTemp)
mates.setLedDigitsShortValue(0, lastlTemp)
mates.setWidgetValueByIndex(MatesWidget.MATES_MEDIA_GAUGE_B,1, lastCpuUse)
mates.setLedDigitsShortValue(1, lastCpuUse)
mates.setWidgetValueByIndex(MatesWidget.MATES_MEDIA_GAUGE_B,2, lastRamUse)
mates.setLedDigitsShortValue(2, lastRamUse)
mates.updateTextArea(1, tempIPaddr, True)
mates.updateTextArea(3, tempIPaddr, True)
mates.updateTextArea(5, tempTime, True)
Downloadable Resources
Here are the links to the software applications, libraries and completed project files.
Raspberry Pi
